Welcome to the last free Holiday Pattern: Little Debbie Crocheted Trees. I love the classic Christmas tree dessert during the holidays and thought it would be fun to make one out of yarn! Now, its your turn. Check out the previous two blog posts for some other free patterns. All of these are great as gifts or for your holiday markets.
All links on this blog post are affiliate links. If you click and purchase from these links, I do receive a small commission. This will help keep the blog running. Thank you so much!
Join yarn at the stitch after the trunk on row 20 (should be stitch number 12). Crochet 7 more single crochets to finish out the row. Cut yarn and slip stitch to tie off.
Panel 2:
Repeat the same instructions for Panel 1 but do NOT cut yarn at the last row, after making the trunk and finishing row 20. Put your crochet hook down for a moment.
Let’s add the details before we finish
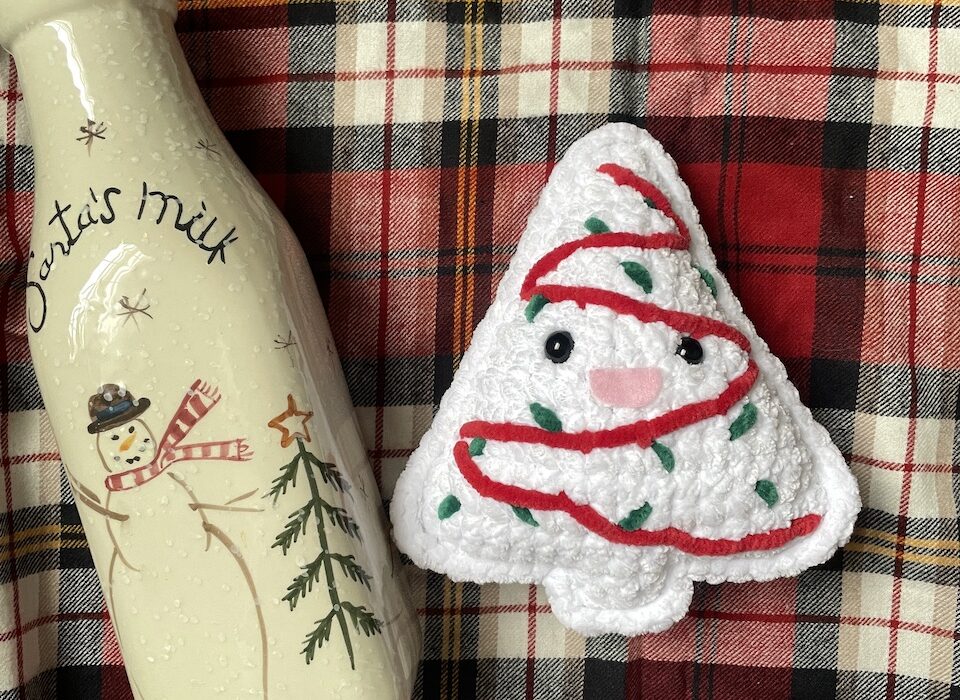
Add the safety eyes between row 10 and 11 with 4 stitches in between.
Using the GREEN yarn, add sprinkles to the 2nd panel, the one you just made. Just add them randomly like the photo below.
Cut a semi circle out of your pink felt and glue the smile below the eyes.
Using the RED yarn, cut a long string. Using the plastic needle, weave the yarn in a zig-zag pattern from the top of the tree to the bottom (use photo below as a reference). To secure the long stretches of yarn, use the same red to anchor different spots. Once you are done, tie off all the red and green yarn behind the panel.
Finishing up:
Once all of your ends are weaved in, match the two panels up, with the face panel on the top and the blank panel on the back. Grab your crochet hook and sc the two panels together starting at the point where you didn’t cut the yarn on panel 2. Your single crocheted edge should go around the whole tree and the trunk.
Leave a small opening to stuff the whole tree. After you stuff the tree to your liking, finish single crocheting the edge.
Once you finish, cut the yarn and fasten off. Weave the tail in.
And that’s it! You made a cute little crocheted tree. Feel free to sell what you make from this pattern, just give me credit.
I would love to see what you make: tag me on Instagram